Showing posts with label Celebrate. Show all posts

Wednesday, September 05, 2012

It's A Boy

My brother and sister-in-law welcomed a baby boy around 2020-something this evening. His name is Jefferson Andrew, named after our great great grandfather. I am so very happy for them!

Happy birthday, Jefferson! 

Wednesday, June 06, 2012

Birthday Cupcakes

Dav's birthday was May 18th. One of his gifts was a Pirate Gnome. He has a piratical tattoo, which is why I thought about a Pirate Gnome. But you know, dear readers, that I can't celebrate anything without baking something! I know exactly what kind of cake I want to make for him, but it's going to take time to practice and with VARF and all the related things I had to do that Thursday, I just didn't have any time. So I had to come up with something simpler. Simple, but still significant in some way. (And, if my past cakes are any indication, three hours is a pretty standard amount of time to spend decorating, so that is considered simple.)

Cupcakes! Cupcakes are easy, bake faster and are (usually) less of a pill to decorate than an entire cake. Dav said he doesn't have a favorite cake, so I just had to come up with something. At first, I thought I would go with chocolate cake and vanilla icing, but I decided to reverse that. I'll tell you why in a minute. And then I decided chocolate on chocolate was even better. 

Dav is a video gamer like me, so I thought a video game theme on the cupcakes would be perfect. But what game? I turned to Google for inspiration and came across these cupcakes. He has a tattoo of the crest of Hyrule, which he said had meaning for him and two of his friends, so I knew instantly this would be perfect. I began plotting items I could put on cupcakes! 

It's been a long time since I played the original Legend of Zelda, so I searched around for images and ideas and found this: an image of the map that came with the game. Notice all the items in the lower right corner, and how they're all on black backgrounds? That's why I needed chocolate icing. 

There were no bells or whistles about making the cupcakes. Just mix, pour, bake, cool, and ice. Tada!


Icing Cupcakes


For the item shapes, I used four colors of fondant; yellow, red, blue, and white, and a black icing marker for fine outlines. I got 24 cupcakes out of the mix so I planned out the images for each.


Cutting Rupees

The beauty of an 8-bit game is that pictures are blocky and simple, so cutting the fondant sheets into the images was way easy.


Drawing Details

Then I drew on some details and added a tiny bit of white for shine. Rupees have to sparkle!


Items Important to Your Quest

Look at all those shapes! The three triangles of the Triforce got brushed with pearl dust to give it a bit of luster.


Collect Your Items

And then onto cupcakes they go! I cut out all my shapes free-hand. Now that I've done it, if I were to do it again, I'd make some paper patterns first. That way at least the rupees and bombs and hearts would be more uniform.


Completed Cupcakes!

It looks like Link has taken a bit of damage, but he's got a fairly full rucksack! There are rupees and bombs, a bow and arrow, five hearts, two candles, the magic sword, the magic book, monster bait, a key, and the all-important Triforce.


Behold, the Triforce!

I'm told that the cupcakes were well-enjoyed. I had such fun making them! Happy birthday, my darling!

Wednesday, March 21, 2012

Tuesday, September 27, 2011

Monday, September 19, 2011

Heave To!

It be Fae's natal day!

Happy Birthday, me fair friend!

Friday, July 29, 2011

Happy Birthday, Grandmom!

My grandmother turned 93 last Thursday. I was chided last year for driving all the way out there on a week day (which was her birthday last year too) so I was told to come on Saturday this time. My mother's sister was in town from Utah, and her brother and his wife were there, and my folks, and Jack joined us too. Since I knew I wouldn't see her on the actual day, I asked my mom if I could make a special cake.

When my Etsy friend Seddy posted this cake on her blog, I knew I had to make one for my grandmother. She used to collect butterflies. I remember spending visits at her home looking at all the butterflies - butterfly ceramics, plates, plaques on the walls, magnets on the fridge, paintings, bed sheets. Butterflies everywhere! When I see butterflies fluttering, I think of my grandmother and her vast butterfly collection. A lot of is has been given away when she moved from her house to the senior community apartment. I knew this cake would be perfect.

I had never worked with gum paste before, so I played with it a bit and made the sand castle that went on Jack's cake. I was pretty sure I could figure out how to make butterflies. Then Seddy posted this butterfly tutorial on her blog and I knew my grandmother's cake would be a reality! As you can see, it was more than a month ago that I started working on this.


Supplies

Even before I saw Seddy's tutorial, my dad had helped me gather supplies: a butterfly cookie cutter, gel food coloring, paint brushes. So the first step was making butterflies, so they'd have plenty of time to dry and stiffen up (and so I could make several attempts if my gum paste skills proved inadequate).

Rolling Gum Paste

First, roll out the gum paste. I used my fondant roller and the smallest bands so each butterfly would have a uniform thickness.

Cookie Cutter

Next, cut the shape with a cookie cutter. I didn't actually do one at a time, this one was cut after I had gotten three or four out of the same clump. Just ball up the remains, roll it out, and cut again.

Painting Butterflies

Painting the butterflies was really fun! Seddy's cake sported thirty confectionery lepidopterans. I ended up with twelve and I was sure that would be plenty. I used four colors; teal, pink, purple, and golden yellow and painted them in layers. So, each butterfly got a base wash, then an accent of another color, and then a small detail with a third color.

Painted Butterflies

Seddy said her butterflies looked the best when they were all lined in black and I completely agree. Here are my painted butterflies!
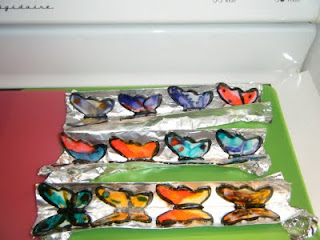
Butterfly Boats

I set them gently into little boats made out of foil so they could dry with their wings slightly up. I think this really makes the in-flight effect. It wouldn't look nearly as neat if they were all flat on the cake.

They were all set aside to dry, then eventually put into a container until it was time to decorate the cake. The moisture from the icing can soften gum paste, which would make droopy butterflies! I didn't actually put them on until we got back from lunch and were ready for cake. The whole butterfly-making process took a good two or three hours, but I took my time with it, and found it a very relaxing and enjoyable task.

Lemon Cakes

Friday arrived and it was time to bake! My mother had heard of the terrible time I had making Jack's red velvet cake so she told me not to do anything fancy. If I used a box cake, no one would care. So, box cake it was! I don't think I've ever had a box lemon cake.

I wanted to do something special to the cake anyway, so I threw a handful of blueberries into the batter and added some frozen lime pulp. With all the heat we've been having, I figured a nice refreshing citrus cake would be delightful. I added some baking time to account for the blueberries and ended up with more of a dense pound cake. No big deal, pound cakes are yummy!

Layers

I prepared the layers. I used lemon curd in the middle, but lined it with icing to help hold it in. Lemon curd is a lot like the stuff you find in lemon meringue pie. We served it at the VA Renaissance festival on biscuits.

Iced Cake

As I was icing the cake, I realized that one can of lemon icing just wasn't enough. I threw the cake in the fridge and ran back out to the store. The can says it can do two 8 or 9 inch cakes. I don't believe it. I used about a can and 2/3.

The whole thing got thrown into the fridge for about an hour before I braved the heat driving to Jack's place. The cake sat in the fridge there too, so it wouldn't melt too much in the hot car the next day and it really would be cool and refreshing.

We came back from lunch. I gently nuked the remaining icing and started placing the butterflies. The icing on the cake was hard from being cold, you see, so I needed something slightly gooey to set the butterflies in. My aunt hovered as I worked. She was really amazed that they were edible and really impressed that I went with butterflies (because her mother collected them, of course!).

Butterflies on a Cake

The big light in my grandmother's kitchen burnt out just as I was ready to place the butterflies on the cake, so getting good pictures of the finished cake wasn't easy. My aunt took some also. Maybe her camera has a better flash than mine.

The Butterfly Cake

Ta-da! The completed Butterfly Cake! I'm glad I only had twelve butterflies, that was really plenty.

Yum!

Doesn't that look delicious! Everyone said the taste of the cake was fantastic and the butterflies were beautiful. We did taste them too (poor butterflies!). Gum paste tastes like nothing, but sweet nothing, and the painted colors didn't really have any flavor.

There is a funny end to this cake. Jack and I took the rest with us. We met some of his friends in Rockville to see Captain America, and then I hung out as he and his buds played Godlike. We brought the cake so they could finish it. The icing liquefied in the hot car while we were in the theater! I'm pretty sure it was still tasty!

Sunday, July 17, 2011

Wednesday, June 29, 2011

Chevron Seven Locked

It was LDS's birthday last week. Her partner, who I will call Bonnie, decided to throw a surprise party for her. I had two important tasks: 1 - keep LDS occupied on Saturday morning while Bonnie decorates and cooks and 2 - make the cake.

The first task was easy. LDS and I have been trying to plan a big Guild Wars gaming day for a couple months. We would make plans and cancel them for various reasons. Bonnie and I told her it was going to be Saturday and she was not allowed to back out. Easy.

Since we were talking about the Stargate cake, as seen on this post at CakeWrecks I decided it would be the perfect time to make the Stargate cake.

I decided to make a fondant topper so that I could have the gate part made days in advance and didn't ruin the whole cake if my sculpting skills proved to be inadequate. I just used Wilton's ready-made fondant, because it's easier. Few people actually eat the fondant anyway. I cut a paper template measuring with the bottom of my cake pan, rolled out some white fondant, and cut a circle.

Next I used black gel coloring to get a gray color out of a ball of fondant and rolled and shaped and rolled to get the outer ring. I placed that a little inside the edges of my white base and textured it with a shell tool.


Carving Glyphs

I used black and blue gel coloring to get a bluish gray for the glyph ring. I mapped out and carved 39 mostly equal little squares for the glyphs and used an image from the Wikipedia page for reference to carve the glyphs. I then added another ring of the first gray color and added some texture.


Finished Gate

The chevrons were made with the same bluish gray and then the whole thing was dusted with silver pearl dust to make it look more metallic. Then the whole thing went in a Ziploc bag and waited. I want the cake to be as fresh as possible and not sit forever holding the heavy fondant top.


Dirty Iced Cake

I made the cake on Thursday. It was a simple box chocolate mix, no bells and whistles there. I then layered and iced my cake with a white buttercream. You can see some crumbs in there. I was sure my choice of color would cover them up, so I wasn't worried about that.


Spray Color Fail

I wanted to use a silver/gray spray Duff brand icing color. I got about five seconds of spray, maybe 1/4 of the side of my cake, before the crappy product gave up the ghost. PANIC!! I was counting on this silver color, and it was exactly the silver color I wanted! It was 2130! There was no Micheal's that I could get to (assuming they close at 2200, and it may be earlier) for more spray! Bonnie was picking up the cake Friday morning! It HAD to be done! I hit the Internet to see if anyone had any tips for unclogging this particular brand of spray color, as I tried hot water and pins and everything I could think of and nothing worked. I found a cake decorating forum where a whole bunch of people indicated that the silver color in particular consistently didn't work. Someone even mentioned that the company knew it was a faulty product and would hopefully fix it with the next production run. Pull your bad product off the shelves, morons! I want to like Duff brand, I really do, but creating a cake crisis like this has me telling everyone not to waste their time (and possibly cost their business) with any of it. You hear that, Duff brand? I'm telling people not to buy your crap! You left me in a hellova pinch and I will never give you another opportunity to do it again. I may not be a professional, but someone ordered this cake from me and expected it done. You fail. And yes, I returned that can to the store on Friday.


It Looks Like Snot


I had bought two cans of Wilton's decorator icing to use for this project and another one. I was almost certain I didn't have enough icing to cover my cake, when I was counting on that spray. I had to try, though, because there was no alternative. I added some black gel color and mixed it up. It looked just like snot.


Iced Cake

It turned into almost the exact shade of gray that I used for part of the gate! And there was exactly enough to cover the cake! Wilton's to the rescue!


Painting the Event Horizon

While the icing was resting and stiffening up, I worked on the event horizon on the gate. Using blue gel color and a bit of vodka, I painted blue on the white fondant field inside the Stargate ring and left the very center white.


Painted Event Horizon

If you watch the show or look at pictures, you can see the pool of the wormhole has this gradual color effect going on. I wasn’t sure about painting the blue detail at first, having never worked with piping gel that would be the pool of the wormhole. But, I figured if it didn't work, the piping gel might cover it.


Topper in Place

The next step was to put my topper on top. It fit perfectly, and I had enough icing to cover the edges of the white fondant base.


Gel Event Horizon

It's time for the final details! I mixed a bit of blue with the clear piping gel and slathered that in the middle of the gate, poking with a ball tool for texture. The painted color underneath created just the effect I was going for. I then mixed up some red piping gel and used that to color the lights on the chevrons and used the rest of that as a boarder on the bottom.


The Completed Stargate Cake

Ta-da! My completed Stargate cake! Everyone said it was amazing and delicious. It hope so, I worked hard on that thing! Constructing the Stargate alone took about three hours (mostly from carving all those glyphs). And the cake color problem added a couple hours of headache that I didn't need. LDS ended up cutting it because I couldn't bring myself to do it. All that work, and then they ate it! But at least I know it was appreciated and enjoyed.

And LDS had no clue Bonnie and I had been planning her surprise party for a month. Jack and I even managed to beat her there so we could warn everyone her arrival was imminent. It was a great party!

Happy Birthday, LDS!

Friday, June 03, 2011

It Happened Last Year

I signed my life away a year ago today.

My kitchen smells like focaccia. Phantom is sleeping on the cat tree in front of the window. Miss Luna is snoozing on a cool dining chair.

This is the home I made for myself. All on my own.

It is a beautiful day.

Monday, November 29, 2010

For My Parents

Happy Anniversary!

41 years of wonderful togetherness!

Wednesday, July 21, 2010

Matriarch

Today is my grandmother's birthday.

HAPPY BIRTHDAY!

She's spent some time in the hospital and a care center but should be allowed back to her apartment today. I will drive the sixty miles to join her and her two daughters for dinner this evening. My mom tried a little to discourage me from coming, because I live far away and have to come back so I can get to work in the morning, but it's ok. You only turn 92 once!

Saturday, February 20, 2010

Sunday, November 01, 2009

Holiday Weekend

I had a headache on Friday and so didn't go to my friends' annual Halloween party. I opted to stay home and sleep. It helped, because the headache was very obviously caused by fatigue. I had stayed up very late almost every day last week and it finally caught up with me. Yesterday was another get-together and it was great, even in the rain. Today is godson #3's first birthday party.

Happy birthday, Jellybean!

Sunday, September 27, 2009

Hats

The woman wears many hats. She is mother, friend, support, understanding, personal shopper, movie buddy. She is all of these and more. I just call her mom.

Happy Birthday, Mom!

Saturday, September 19, 2009

Arr! It Be a Birthday!

Happy Birthday, Fae!

May the wind fill yer sails and the treasure be not buried too deep!

Wednesday, August 19, 2009

Not a Rebirth

Just the anniversary of a birth.

Happy Birthday, Phoenix!

Wednesday, June 10, 2009

For Moon

Today is my beautiful, talented sister-in-law's birthday!

Happy Birthday, Moon!

Monday, May 04, 2009

Monday, April 13, 2009

On a Much Better Note

Happy birthday, he-who-does-not-yet-have-an-alias!

Saturday, March 21, 2009

Someone is Getting Old

But it's not me!

Happy Birthday, my dear brother.